
How to Take Down Protective Styles Without Excess Shedding: A Comprehensive Guide to Healthy Hair Retention
Few things are more discouraging than finally taking down a protective style—braids, twists, a wig install—and seeing what looks like half your progress in the sink. Some shedding is normal. Clumps of broken hair and knots that refuse to budge are not. This moment, often filled with anticipation, can quickly turn into dread if not approached with the right knowledge and tools. It’s a pivotal point in your hair journey, determining whether your protective style truly protected your length or inadvertently contributed to its demise.
This guide walks you through the takedown as a deliberate, multi-step process, not a late-night chore. It’s an act of self-care, a ritual designed to honor the time and effort you invested in your protective style, and more importantly, in your hair’s health. We’ll delve deep into each phase, from the initial preparation to the final reset, ensuring that every strand is treated with the reverence it deserves. You’ll learn how to soften buildup before you touch a braid, how far to cut extension hair, how to detangle shed hair without ripping through it, and how to reset your scalp afterward so your next style doesn’t start from damage. This isn’t just about removing a style; it’s about preserving your legacy of length and strength.
The difference between healthy length retention and “all my hair came out” is often in how you take down your protective styles. This guide shows you how to remove braids, twists, and wig prep styles step by step—softening buildup, unraveling without ripping, detangling shed hair, and resetting with a gentle wash day—so you protect the inches you worked for. It’s a holistic approach, blending cultural wisdom with practical, science-backed techniques, all designed to empower you with the confidence to manage your beautiful hair with grace and efficacy.
The Philosophy of Mindful Takedown: Why It Matters
Before we dive into the practical steps, let’s establish a foundational philosophy: mindful takedown. This isn’t just a chore; it’s an extension of your self-care routine. Just as you carefully installed or had your protective style installed, its removal demands equal, if not greater, attention. Rushing through this process is akin to sprinting through a marathon’s finish line without proper cool-down—it negates the benefits and can lead to injury, or in this case, significant hair damage.
Mindful takedown means being present, patient, and gentle. It means understanding that your hair, especially after being tucked away for weeks, is delicate and needs to be handled with extreme care. It’s about listening to your hair, feeling for tangles, and responding with softness rather than force. This approach transforms a potentially damaging experience into a nurturing one, ensuring that the protective style truly lives up to its name by leaving your hair healthier than it was before.
Understanding the Cumulative Impact of Neglect
Each time you rush a takedown, you risk cumulative damage. A single rough session might not seem catastrophic, but repeated instances of breakage, excessive shedding due to improper detangling, and scalp irritation can lead to long-term issues. These can manifest as thinning edges, weakened strands, stunted growth, and even traction alopecia if tension and damage are consistently applied. Your hair remembers every tug, every rip, every dry comb-through. By adopting a mindful approach, you’re investing in the longevity and vitality of your hair, ensuring that each protective style cycle contributes positively to your overall hair health journey.
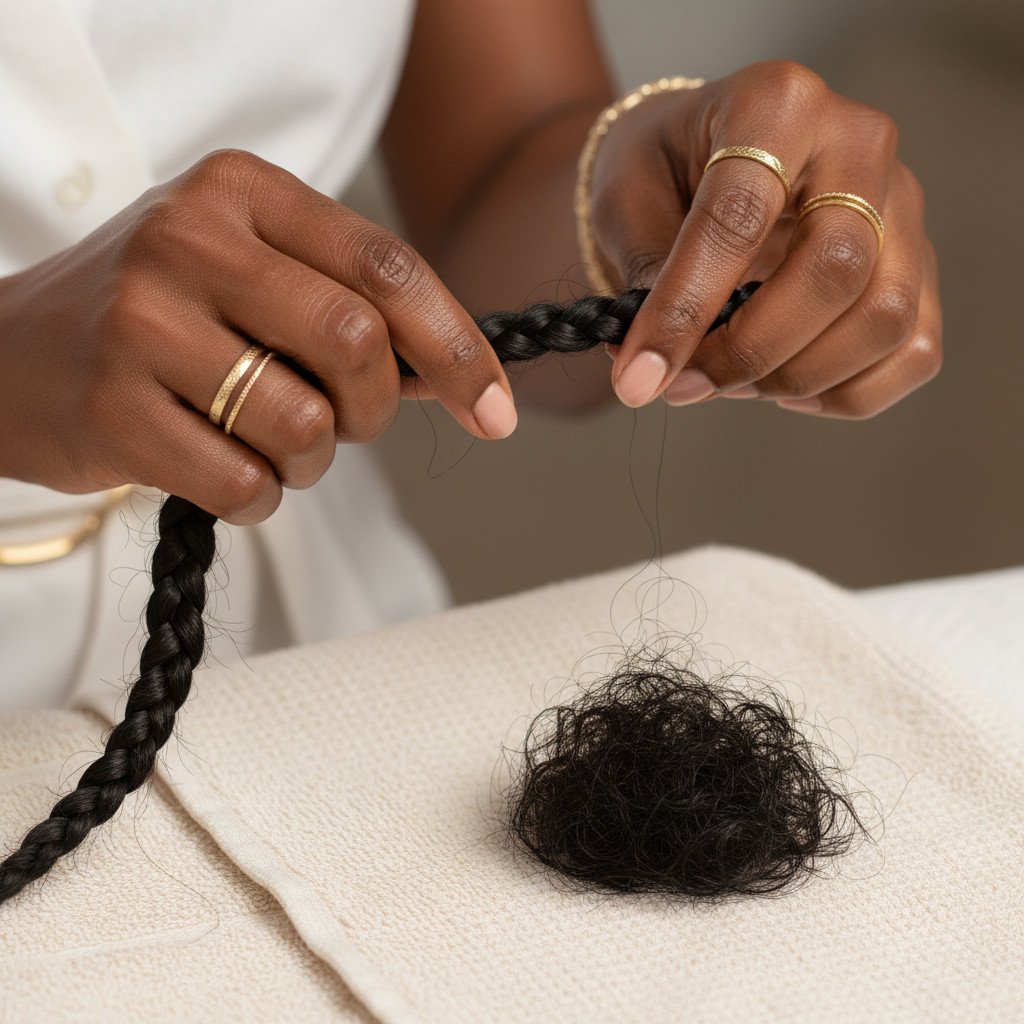
What You’re Seeing: Normal Shed Hair vs Breakage – A Critical Distinction
Before you even pick up scissors, it helps to understand what’s “too much” shedding. This distinction is paramount for managing expectations and identifying potential problems. On average, people shed 50–100 hairs a day. When your hair has been in a protective style for four to eight weeks, those shed hairs are trapped in braids or twists instead of falling out daily. This means that after 6 weeks (42 days), you could have accumulated anywhere from 2,100 to 4,200 shed hairs. Seeing this amount all at once can be alarming, but it’s often a natural occurrence.
When you remove a long-term style, it’s normal to see more hair than you’re used to—but those strands should mostly be full-length with a tiny bulb at one end. This bulb, often white or slightly darker, is the root of the hair, indicating that the hair has completed its natural growth cycle and detached from the follicle. These full-length strands, even in large quantities, are typically normal shedding.
However, snapped pieces with no bulb, a rough feel, and tangles clinging together point to breakage. Breakage occurs when the hair shaft itself breaks, often due to physical stress, dryness, or chemical damage. These pieces are typically shorter, lack the bulb, and may have frayed or split ends. Breakage is often caused by rushing or taking styles down on dry, unprepared hair. It’s the enemy of length retention and a clear sign that your takedown technique needs adjustment. Understanding this difference will empower you to assess your hair’s condition accurately and adjust your routine accordingly.
The Science Behind Shedding and Growth Cycles
To further demystify shedding, let’s briefly touch on the hair growth cycle. Each hair follicle goes through three main phases: anagen (growth), catagen (transitional), and telogen (resting/shedding). During the anagen phase, hair actively grows. This phase can last anywhere from 2 to 7 years. The catagen phase is short, lasting about 2-3 weeks, where hair growth stops. Finally, the telogen phase, lasting about 2-4 months, is when the hair rests and eventually sheds to make way for new growth. When your hair is in a protective style, the shed hairs from the telogen phase simply have no escape. They remain intertwined within the braids or twists, waiting to be released during takedown. This natural process is why a significant amount of shed hair is expected and normal.
Identifying Breakage: A Closer Look
Beyond the lack of a bulb, breakage often presents with specific characteristics. You might notice:
- Short, uneven pieces: Unlike full-length shed hairs, broken strands are often jagged and vary in length, indicating they snapped at different points along the shaft.
- Frayed or split ends: The ends of broken hair might look rough, split, or damaged, a clear sign of physical stress.
- Dry, brittle texture: Hair that has broken off often feels dry and brittle, lacking the elasticity and smoothness of healthy hair.
- Location-specific damage: Breakage is often concentrated in areas of high tension, such as the edges, nape, or crown, where braids might have been too tight or friction was consistent.
If you consistently observe these signs, it’s a red flag. It indicates that either the protective style itself was too harsh, worn for too long, or your takedown method is causing undue stress. Addressing these issues proactively is crucial for maintaining your hair’s integrity and achieving your length goals.
Step 1 – Gather Your Takedown Tools: Preparation is Key
Takedown is not the time to improvise with whatever’s in your bathroom drawer. Having the right tools within reach keeps you calmer and gentler, which your strands can feel. This preparation phase is as crucial as any other step, as it sets the tone for the entire process. Imagine a surgeon attempting a delicate procedure without the correct instruments—the outcome would be compromised. Your hair deserves the same level of meticulous preparation.
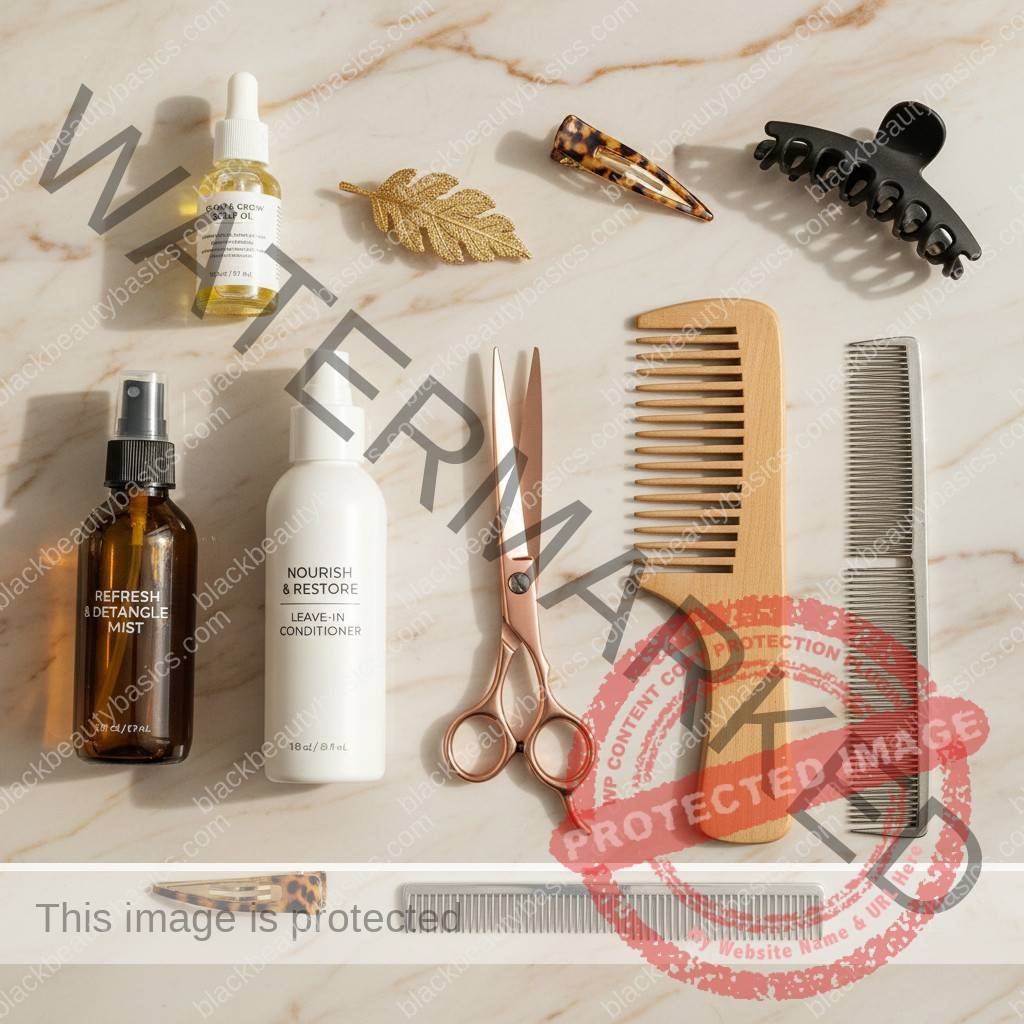
The Essential Takedown Kit: Your Hair’s Best Friends
Investing in quality tools, specifically for takedown, is a small price to pay for the health and longevity of your hair. Here’s what your essential kit should include:
- Sharp hair shears (not kitchen scissors): This is non-negotiable. Dull scissors will snag and damage your hair, leading to split ends and breakage. Professional hair shears are designed for clean cuts, minimizing stress on the hair shaft. Look for a pair specifically labeled for hair cutting. Shop professional hair shears on Amazon.
- A spray bottle with water or water mixed with a bit of leave-in: Moisture is your best friend during takedown. A fine mist spray bottle allows for even distribution, helping to soften hair and loosen buildup without oversaturating. A mix of water and a light leave-in conditioner adds extra slip and hydration.
- A slippery leave-in conditioner, detangling spray, or light oil: These products provide the much-needed slip to help unravel tangles and shed hair without excessive pulling. Look for formulas with good slip, often containing ingredients like marshmallow root, slippery elm, or ample emollients. Some excellent options include slippery leave-in conditioners on Amazon or detangling sprays for natural hair on Amazon.
- Hair clips or bands to separate sections: Organization is key to preventing re-tangling and making the process manageable. Sectioning clips, duckbill clips, or even large hair claws work perfectly for isolating sections as you work.
- A wide-tooth comb and, optionally, a fine-tooth comb for buildup at the roots: The wide-tooth comb is your primary detangling tool, always starting from the ends and working your way up. A fine-tooth comb can be helpful for gently working through stubborn root buildup, but use it with extreme caution and only after significant softening.
- A towel or cape over your shoulders and good lighting: Protect your clothes from product and shed hair. Good lighting is critical so you can clearly see what you’re doing, especially when cutting extensions or dealing with intricate root buildup.
- A small bowl for shed hair: Having a designated place to collect shed hair helps you monitor the amount and distinguish it from breakage. It also keeps your workspace tidy.
- A comfortable chair and entertainment: Takedown can be a lengthy process. Make sure you’re comfortable and have something to keep your mind engaged, whether it’s a podcast, a movie, or your favorite playlist. This helps prevent impatience and rushing.
Think of this like surgery on your hair—you want everything you need ready before you start, so you’re not tugging and rushing because you’re tired. This meticulous preparation is an act of love for your hair, setting the stage for a successful and damage-free takedown.
Why Specific Tools Matter: A Deeper Dive
Each tool in your kit serves a specific purpose, contributing to the overall success of your takedown. Let’s explore why these particular items are indispensable:
- Sharp Shears: The integrity of your hair shaft is delicate. Dull scissors crush and fray the hair cuticle, leading to split ends that travel up the hair shaft, causing more damage. Sharp shears provide a clean, precise cut, minimizing trauma to the hair. This is especially important when cutting extension hair close to your natural hair.
- Spray Bottle with Moisturizing Mix: Dry hair is brittle hair. Attempting to unravel braids or detangle dry hair is a recipe for breakage. The spray bottle ensures that your hair remains pliable and hydrated throughout the process. Adding a leave-in conditioner or a light oil to the water enhances slip, making it easier for tangles to release without force. This pre-moistening step is crucial for softening any product buildup and the hair itself.
- Slippery Products (Leave-in, Detangling Spray, Oil): These products are designed to reduce friction between hair strands. When hair is matted or tangled, the individual strands cling to each other, creating knots. Slippery products create a barrier, allowing strands to glide past each other. This is vital for gently separating shed hairs from attached hairs and for unraveling tightly coiled sections. Look for ingredients like aloe vera, glycerin, and natural oils (jojoba, argan, sweet almond) which are excellent for providing slip and moisture.
- Sectioning Clips: Working in small, manageable sections is the golden rule of detangling and takedown. Clips prevent the rest of your hair from getting in the way or re-tangling as you focus on one area. This systematic approach ensures that no section is overlooked and that you maintain control throughout the process.
- Wide-Tooth Comb vs. Fine-Tooth Comb: The wide-tooth comb is your primary detangling tool because its wider teeth are less likely to snag and pull hair. Always start detangling with your fingers, then move to a wide-tooth comb, working from the ends upwards. A fine-tooth comb should be reserved for very specific situations, such as gently working through stubborn product buildup at the roots after it has been thoroughly softened. Using a fine-tooth comb on dry or tangled hair will almost certainly lead to breakage.
- Good Lighting and Protective Covering: Visibility is key. You need to clearly see the demarcation between your hair and extensions, the state of your roots, and any tangles. A well-lit area prevents accidental cuts or missed knots. A towel or cape protects your clothing from shed hair and product, making cleanup easier and allowing you to focus on the task at hand without worrying about mess.
By understanding the ‘why’ behind each tool, you empower yourself to use them effectively and mindfully, turning a potentially arduous task into a smooth, hair-preserving ritual.
Step 2 – Soften the Style Before You Touch a Braid: The Pre-Takedown Ritual
Dry, stiff braids or twists are more likely to snag and break your hair during removal. Taking 10–20 minutes to soften them first can save you weeks of repair later. This initial softening phase is often overlooked but is arguably one of the most critical steps. It’s about preparing your hair for the manipulation it’s about to undergo, much like warming up before a workout. Without this step, you’re setting yourself up for increased friction, breakage, and a much more frustrating experience.
The Art of Pre-Takedown Softening: A Detailed Approach
This isn’t just a quick spritz; it’s a deliberate process designed to infuse moisture and slip into every strand, loosening product buildup and making your hair more pliable. Here’s how to execute it effectively:
- Lightly mist your braids or twists with water or a water-based refresher, focusing on your roots and mid-lengths: Use your spray bottle to gently dampen the entire style. Don’t drench it, but ensure that the hair feels soft and pliable. Pay particular attention to the roots, where product buildup (gel, edge control, lint) tends to accumulate, and the mid-lengths, which can become dry and stiff over time. A good water-based refresher might contain ingredients like aloe vera juice, rosewater, or light humectants.
- Follow with a detangling spray, leave-in conditioner, or a light oil along each section to add slip: After misting, apply a generous amount of your chosen slippery product. Work it into the braids or twists, focusing on the areas that feel stiffest or have the most visible buildup. For braids, gently squeeze the product into the length. For twists, you can lightly coat the outside and gently work it in. This step is crucial for creating the slip needed to unravel without friction.
- Gently massage your scalp with your fingertips to start loosening buildup at the roots: While the products are settling in, use the pads of your fingertips (not your nails) to gently massage your scalp. This stimulates blood flow, helps to dislodge any dry flakes, and starts breaking down the barrier of product buildup that might be clinging to your hair follicles. This also feels incredibly soothing after weeks of having your scalp tucked away.
Let this sit for at least 10–15 minutes, or even longer if your hair feels particularly dry or has significant buildup. You’re giving product and water time to penetrate old gel, edge control, and lint so they’re easier to break up later. For very stubborn buildup, you might even consider leaving it on for 30 minutes or applying gentle heat with a hooded dryer or steamer (if you have one) to enhance penetration. This softening period is an investment that pays dividends in reduced breakage and a smoother takedown.
Choosing the Right Softening Products
The effectiveness of this step heavily relies on the products you choose. Look for formulations that are specifically designed to provide slip and moisture without leaving a heavy residue.
- Water-Based Refreshers: These are ideal for rehydrating dry hair. Ingredients like aloe vera, glycerin, and hyaluronic acid draw moisture into the hair.
- Detangling Sprays: Often contain cationic surfactants that neutralize the negative charge on hair strands, reducing static and friction. They also typically have emollients that coat the hair, providing slip. Look for sprays that are lightweight and don’t contain silicones that can build up.
- Leave-in Conditioners: Opt for creamy, water-based leave-ins that are rich in humectants and emollients. These provide deep hydration and excellent slip.
- Light Oils: Oils like jojoba, argan, sweet almond, or grapeseed oil can add an extra layer of slip and help to break down oil-based products like edge control. Apply sparingly to avoid oversaturation, especially if your hair is prone to feeling greasy.
Experiment with different products to find what works best for your hair type and the specific type of buildup you typically experience. The goal is to create a slick, pliable canvas that allows for effortless unraveling.
The Psychological Benefit of Softening
Beyond the physical benefits, this softening ritual has a psychological impact. It forces you to slow down, to engage with your hair gently, and to prepare mentally for the task ahead. This deliberate pause helps to reduce the urge to rush, fostering a sense of calm and patience that is essential for a damage-free takedown. It transforms the act from a dreaded chore into a mindful self-care practice, aligning perfectly with the Black Beauty Basics philosophy of deep feminine confidence and self-love.
Step 3 – Cut Extensions Safely (If You Have Added Hair): Precision is Paramount
If your style includes extensions, cutting them down to a manageable length makes takedown much faster. The key is not cutting your own hair in the process. This step requires extreme caution and a keen eye, as a misplaced snip can undo months or even years of growth. It’s a moment where patience and precision are more valuable than speed.
Where and How to Cut: A Methodical Approach
This is not the time for guesswork. Each cut should be deliberate and well-considered.
- Locate the point where you’re sure your natural hair ends—often a change in thickness, texture, or color: This is the most critical part. Your natural hair will typically feel different from the extension hair. It might be finer, have a different curl pattern, or a slightly different color. Gently feel along the length of the braid or twist to identify this transition point. If your hair is colored, the natural hair might be darker at the root. If your hair is very fine, the extension might feel significantly thicker.
- Cut the extension several inches below that point: Once you’ve identified where your natural hair ends, make your cut a generous few inches below it. This provides a crucial buffer zone, minimizing the risk of accidentally cutting your own hair. It’s always better to cut too low than too high. You can always trim more later if needed.
- If you are uncertain, err on the side of cutting lower; you can always trim again as you go: This reiterates the importance of caution. If there’s any doubt, cut further down. As you unravel, you’ll get a clearer picture of your natural hair’s length, and you can make subsequent, more precise cuts if necessary.
- Cut only a few braids or twists at a time, then remove them before cutting more: This systematic approach is a safeguard. By cutting and then immediately unraveling a small section, you verify your cutting point. This prevents you from making a widespread error across your entire head. It also helps manage the volume of hair you’re dealing with at any given time.
- Always hold the section taut and away from your scalp: When cutting, pull the braid or twist gently away from your head. This isolates the section and reduces the chance of accidentally cutting nearby hair or even your skin.
Resist the urge to race through with scissors. A few extra minutes of caution here prevents that sickening feeling when you realize you’ve cut your own hair. This step demands your full attention and a steady hand. It’s a testament to your commitment to healthy hair retention.
Tools for Precision Cutting
While we’ve already emphasized sharp shears, let’s briefly touch on their importance here. Dull scissors can slip, snag, and make an uneven cut, increasing the risk of cutting your natural hair. Professional hair shears are designed for precision and sharpness, making this delicate task safer and more efficient. Ensure your shears are clean and free of rust or debris before you begin.
Common Pitfalls to Avoid
- Cutting in poor lighting: Insufficient light can obscure the demarcation line between your hair and the extensions, leading to accidental cuts.
- Rushing the process: Impatience is the enemy of precision. Take your time, breathe, and focus on each individual cut.
- Not using a buffer zone: Always cut several inches below where you think your hair ends. It’s a simple safety measure that can save you a lot of grief.
- Cutting too many braids at once: This can lead to a domino effect of errors if your initial assessment of your hair’s length was incorrect. Work in small, manageable batches.
- Not holding the hair taut: Loose hair can shift, making it difficult to achieve a clean cut and increasing the risk of accidents.
By adhering to these guidelines, you transform the potentially daunting task of cutting extensions into a controlled, safe, and effective part of your takedown routine, preserving every precious inch of your natural hair.
Step 4 – Unravel Gently, One Section at a Time: The Art of Patience
This is where patience matters most. Ripping or yanking braids and twists apart creates mid-shaft breakage that shows up later as frayed ends and uneven length. This stage is the heart of the takedown process, requiring a delicate touch and unwavering focus. It’s a conversation with your hair, where you gently persuade it to release its hold, rather than forcing it.
Best Practices for Unraveling: A Step-by-Step Guide to Gentleness
Approaching unraveling systematically ensures minimal stress on your strands.
- Work in sections: Clip the majority of your hair up and focus on a small, manageable area. This prevents the rest of your hair from getting in the way, re-tangling, or becoming dry. Start at the back or side of your head, where it’s often easier to see and reach.
- Start at the very ends and slowly unravel upward using your fingers: Your fingers are your best tools here. They are sensitive to tangles and knots in a way that combs are not. Gently separate the strands at the very end of the braid or twist, then slowly work your way up, feeling for resistance. When you encounter a knot, don’t pull. Instead, use your fingers to gently loosen it.
- Use the tip of a rattail comb only when needed, and never jab it into knots: A rattail comb can be helpful for separating stubborn sections or for creating a clean part, but it should be used sparingly and with extreme care. If you use it, gently slide the tip along the braid to loosen it, never forcing it into a tangle. Aggressive use of a comb can cause significant breakage.
- Add more leave-in, detangler, or oil as you go if you hit a snag; don’t try to “fight through” dry tangles: This is a crucial rule. If you feel resistance, stop. Do not pull. Instead, re-moisten the section with your spray bottle and apply more slippery product. Give it a moment to penetrate, then try again. Dry tangles are brittle and will break under pressure.
- Talk kindly to yourself while you work: It sounds small, but it helps you keep your movements slower and softer. This mindful approach fosters patience and reduces the likelihood of rushing. Remind yourself that this is an act of self-care and that your hair deserves your gentle attention.
- Be extra careful with the ends of your natural hair: As you get closer to where your natural hair begins, be especially gentle. This is often where the most delicate and oldest parts of your hair reside, and they are most prone to breakage.
As each braid or twist is out, keep that section separate from the ones you haven’t touched yet. This prevents your free hair from tangling into the style you’re still removing. You can loosely braid or twist the unraveled sections, or secure them with clips, to keep them organized and prevent them from re-tangling with each other or with the still-braided sections.
The Importance of Finger Detangling
Finger detangling is superior to comb detangling during the initial unraveling phase because your fingers can feel tangles and knots that a comb might simply rip through. Your fingers allow for a more intuitive and gentle approach, preserving more strands. It also helps you to identify areas of significant buildup or matting that require extra attention and product.
Managing Different Protective Styles
The unraveling technique might vary slightly depending on the style:
- Braids (Box Braids, Knotless Braids): These can be quite dense. Focus on gently separating the strands at the end and slowly working your way up. If the braid is very tight, you might need more product to create slip.
- Twists (Senegalese Twists, Havana Twists): Twists are often easier to unravel as they are less tightly interwoven than braids. However, they can still snag if dry.
- Wig Braids/Cornrows: These are often braided very close to the scalp. Use a rattail comb very carefully to gently lift the cornrow from the scalp, then unravel with your fingers. Be especially mindful of tension at the scalp.
Regardless of the style, the core principles of patience, moisture, slip, and gentleness remain paramount. This step is a marathon, not a sprint, and your hair will thank you for every moment of care you invest.
Step 5 – Deal with Root Buildup Before You Detangle: The Unsung Hero of Takedown
The “ring” of buildup at the roots—where shed hair, gel, sweat, and lint meet—is where many people lose the most hair during takedown. Trying to comb straight through that ring on dry hair is a recipe for breakage. This root buildup is often the most challenging aspect of takedown, but addressing it correctly is crucial for preserving your length and scalp health. It’s a delicate operation that requires specific tools and techniques.
Softening and Removing Root Buildup: A Meticulous Process
This step follows immediately after you’ve unraveled a braid or twist and before you attempt to detangle the entire section. It’s about isolating and conquering the most stubborn part of the takedown.
- Once a braid or twist is out, spray the root area and that little bump of buildup with water or a water-based leave-in: Immediately target the root area. The buildup often forms a compact, matted ring around the base of your natural hair. Saturate this area thoroughly with your moisturizing spray. This begins to soften the hardened product and loosen the trapped shed hairs.
- Apply a bit of conditioner, detangling spray, or oil directly to the buildup and gently massage it between your fingertips to loosen it: This is where the magic happens. Take a small amount of your slippery product and work it directly into the matted root section. Use your fingertips to gently rub and massage the buildup. You’ll feel it start to break down and become less rigid. This physical manipulation, combined with the slip from the product, helps to separate the shed hairs from each other and from your attached hair.
- Use your fingers first to separate the stuck hairs: Your fingers are the most sensitive and effective tools for this initial separation. Gently pull apart the matted sections, working slowly and patiently. You’ll start to see individual shed hairs emerge. This finger work is critical before introducing any comb.
- Only when it’s softened should you bring in a fine-tooth comb, and even then, work gently, stroking downwards instead of ripping through: If, after significant finger work and product application, there are still stubborn bits of buildup, you can carefully introduce a fine-tooth comb. However, this is a last resort and must be done with extreme caution. Use the comb to gently stroke downwards, away from the scalp, through the softened buildup. Never comb upwards or rip through. The goal is to melt that ring, not drag it down the length of your hair.
Your goal is to melt that ring, not drag it down the length of your hair. Once it’s gone, you can detangle more confidently without hidden knots waiting for your comb. This meticulous approach prevents the most common cause of breakage during takedown.
Why Root Buildup is So Problematic
Root buildup is a concoction of several elements:
- Shed Hair: The primary component, accumulated over weeks.
- Product Residue: Gels, edge controls, mousses, and even some leave-ins can harden and create a sticky matrix.
- Lint and Debris: From clothing, pillows, and the environment, these particles get trapped in the sticky product and shed hair.
- Sebum and Sweat: Natural scalp secretions that can contribute to the sticky, matted texture.
When all these elements combine, they create a dense, often hardened mass that acts like glue, binding your shed hairs tightly to your attached hairs. Attempting to comb through this dry will inevitably lead to ripping and tearing of your healthy strands. The softening and massaging steps are designed to dissolve this glue, allowing the shed hairs to release freely.
Product Recommendations for Root Buildup
For tackling stubborn root buildup, consider products with extra dissolving power:
- Clarifying Conditioners: Some conditioners are formulated with gentle surfactants that can help break down product buildup while still providing slip.
- Apple Cider Vinegar (ACV) Rinse: A diluted ACV rinse (1 part ACV to 3-4 parts water) can be sprayed onto roots to help dissolve buildup and balance scalp pH. Follow with a moisturizing product.
- Oil Blends: A blend of castor oil (known for its thickness and ability to break down other oils) and a lighter oil like jojoba or grapeseed can be massaged into the roots to help emulsify product buildup.
- Pre-Poo Treatments: Some pre-poo products are specifically designed to loosen debris and tangles before shampooing.
Remember, the key is to apply these products and give them time to work. Patience is your most powerful tool in this step. By meticulously addressing root buildup, you are safeguarding your hair’s foundation and ensuring a smoother, more successful detangling process for the rest of your hair.
Step 6 – Detangle as You Go, Not All at the End: The Strategy for Sanity and Strands
Waiting until every braid is out before you start detangling leaves you with a huge, matted mass to deal with when you’re already exhausted. Detangling section by section is kinder to both your hair and your sanity. This proactive approach prevents the overwhelming feeling of a massive detangling session and significantly reduces the risk of breakage. It’s about breaking down a daunting task into manageable, less stressful segments.
Section-by-Section Detangling: A Methodical Approach to Preservation
This strategy ensures that your hair remains organized and that each section receives the individualized attention it needs.
- After you remove a few braids or twists in one area and clear the root buildup, add more slip (leave-in or conditioner) and finger-detangle that section from ends to roots: Once you’ve unraveled a small cluster of braids/twists and meticulously dealt with the root buildup for each, bring them together into one small section. Re-apply a generous amount of your slippery leave-in or conditioner. Start at the very ends of this section and gently work your fingers through, separating strands and releasing shed hairs. Gradually work your way up to the roots. Your fingers are still your primary detangling tool here, as they are the most gentle and effective for feeling out knots.
- Once most shed hair is out, use a wide-tooth comb to gently go through the section, again from ends upward: After finger-detangling has removed the majority of shed hair and loosened most tangles, you can introduce your wide-tooth comb. Start at the very ends of the section and gently comb downwards, then slowly work your way up. If you encounter any resistance, stop, add more product, and use your fingers to loosen the tangle before trying the comb again. Never force the comb through.
- Twist or braid that detangled section loosely before moving on; this keeps it organized and prevents re-tangling: This is a critical organizational step. Once a section is fully detangled, loosely twist or braid it. This keeps it separate from the still-tangled hair and prevents it from re-tangling with itself or other sections while you work on the rest of your head. Secure the loose twist or braid with a clip or hair tie.
You’ll still see shed hair in each section—that’s normal. The difference is that you’re removing it gently rather than yanking it out all at once. This systematic approach transforms a potentially overwhelming task into a series of small, achievable victories, preserving your hair’s length and your peace of mind.
The Benefits of Detangling as You Go
- Reduced Overwhelm: Facing a whole head of matted, unraveled hair can be incredibly daunting. Working in small sections makes the task feel less intimidating and more manageable.
- Minimized Breakage: By detangling small, moisturized sections, you reduce the friction and force required, leading to significantly less breakage. Trying to detangle a large, dry mass of hair inevitably results in ripping and tearing.
- Better Product Penetration: Applying detangling products to smaller sections ensures that each strand receives adequate slip and moisture, making the detangling process more effective.
- Improved Visibility: Working on small sections allows you to clearly see any tangles, knots, or areas of concern, enabling you to address them meticulously.
- Time Efficiency (Paradoxically): While it might seem slower initially, preventing massive tangles and breakage actually saves time in the long run, as you won’t be battling stubborn knots or dealing with extensive damage repair.
Choosing Your Detangling Products Wisely
For this phase, the slipperier, the better. Look for products specifically formulated for detangling natural hair. Ingredients like marshmallow root, slippery elm, aloe vera, and various emollients (shea butter, mango butter, natural oils) are excellent for providing the necessary slip. A good detangling conditioner or a dedicated detangling spray can make a world of difference. Consider investing in a high-quality detangling brush designed for natural hair, with flexible bristles that minimize snagging, but always start with your fingers and wide-tooth comb first.
Remember, this step is about patience and precision. It’s an act of kindness to your hair, ensuring that every strand is respected and preserved. By detangling as you go, you are actively participating in your hair’s healthy growth journey, setting it up for success in the next phase of its life cycle.

Step 7 – Pre-Poos and “Conditioner First” Before Shampoo: The Ultimate Moisture Shield
After hours of takedown, your hair often needs slip more than it needs shampoo right away. Going straight into a harsh wash on dry, tangle-prone hair can create new knots and breakage. This
Frequently Asked Questions
How long should it take to remove a protective style properly?
It depends on the style and density of your hair, but a careful takedown usually takes several hours—often 2–4 hours for medium-sized braids or twists, sometimes longer for micro styles. If you try to squeeze removal into 45 minutes, you’re almost guaranteed to rush and cause breakage. It’s better to plan takedown as its own appointment: choose a time when you’re not exhausted, break it up into two sessions if needed, and give yourself permission to stop and rest if your hands or patience start to fade.
Why does my hair shed so much after protective styles?
Remember that you shed 50–100 hairs a day on average. In a protective style, those hairs have nowhere to go, so they collect in your braids or twists. When you finally remove the style, all those weeks of shed strands come out at once, which can look alarming but is often normal. Excess shedding becomes a concern when you see short, snapped pieces, bald or thinning patches, or persistent tenderness along the scalp. In those cases, it’s worth reassessing both your style choices and your takedown technique—and, if needed, speaking to a professional.
Should I detangle before or after washing when I take down a style?
After a protective style, detangling is safest when you’ve added slip but before you fully shampoo. That usually means detangling as you remove each braid or twist with leave-in or oil, then doing a more thorough detangle with conditioner or pre-poo before shampooing. Washing first on hair that’s still full of shed strands and root buildup can weld tangles together, making detangling later much harder and more damaging.
Can I go straight from one protective style into another?
You can, but it’s rarely kind to your hair. Your strands and scalp benefit from a reset: a full cleanse, deep conditioner, careful detangle, and at least a short period in low-tension styles. Going style-to-style without a breather increases the risk of cumulative damage, hidden matting, and progressive thinning—especially around edges and areas that consistently bear tension.
How can I tell if hair loss after takedown is shedding or breakage?
Look closely at the strands. Shed hairs are usually full-length and have a tiny white or darker bulb at one end, where they detached from the follicle. Breakage tends to show up as shorter pieces with no bulb, sometimes with rough or split ends. If most of what you see has bulbs and your density looks the same, you’re likely seeing normal accumulated shedding. If the majority is short, bulb-less pieces and your hair looks thinner, that points to breakage.
What should I do immediately after I finish taking a protective style down?
Once everything is out and you’ve detangled with conditioner or pre-poo, move into a gentle wash day: cleanse the scalp thoroughly, deep condition, detangle again, and then put your hair into a simple, low-tension style. Avoid heavy manipulation, tight styles, or strong treatments (like harsh protein or strong peels on the scalp) the same day. Think of post-takedown as recovery time. Your hair has been under tension and now has been handled a lot during removal; your job is to calm everything down, rehydrate, and let your strands rest.
What are the best products to use for pre-takedown softening?
For pre-takedown softening, focus on products that provide ample moisture and slip. A spray bottle with water mixed with a hydrating leave-in conditioner or a dedicated detangling spray is ideal. You can also use a light oil like jojoba or argan oil to help break down product buildup and add extra lubrication to the strands. Look for ingredients like aloe vera, glycerin, marshmallow root, or slippery elm for maximum slip.
How can I prevent my natural hair from re-tangling after I unravel a section?
To prevent re-tangling, it’s crucial to work in small, manageable sections. As soon as you’ve unraveled and detangled a section, loosely braid or twist it and secure it with a hair clip or band. This keeps the detangled hair contained and separate from the sections you’re still working on, minimizing the chances of it getting matted or tangled again.
Is it okay to use heat during the takedown process?
Generally, it’s best to avoid direct heat during the takedown process, as your hair may already be delicate after weeks in a protective style. However, very gentle, indirect heat from a hooded dryer or steamer can be beneficial during the pre-takedown softening or pre-poo phase. This can help products penetrate better and loosen stubborn buildup, but always ensure the heat is low and doesn’t dry out your hair.
What if my scalp is very itchy or flaky after removing a protective style?
An itchy or flaky scalp is common after protective styles due to product buildup and lack of direct cleansing. During your post-takedown wash day, focus on thorough but gentle scalp cleansing. Use a clarifying shampoo on the scalp first, followed by a moisturizing shampoo for the lengths. Consider a scalp treatment with soothing ingredients like tea tree oil or peppermint. If itching persists or is severe, consult a dermatologist, as it could indicate a more serious scalp condition.
Shop professional hair shears on Amazon
Shop slippery leave-in conditioner on Amazon
Shop detangling spray for natural hair on Amazon
Related next steps
Related posts:
 Combining Low-Manipulation Styling With Protective Styles and Trims: A Holistic Approach to Natural Hair Retention
 Mastering the Art of Natural Hair Prep: Your Ultimate Guide to Protective Styles Without Breakage
 Protective Styling 101 – How to Choose Styles That Retain Length Without Damaging Your Edges
 Everyday Styles That Support Growth and Retention
 Protective Styles That Actually Protect: The Ultimate Guide to Natural Hair Health and Growth
 Low‑Manipulation Styles for Length Retention in Natural Hair