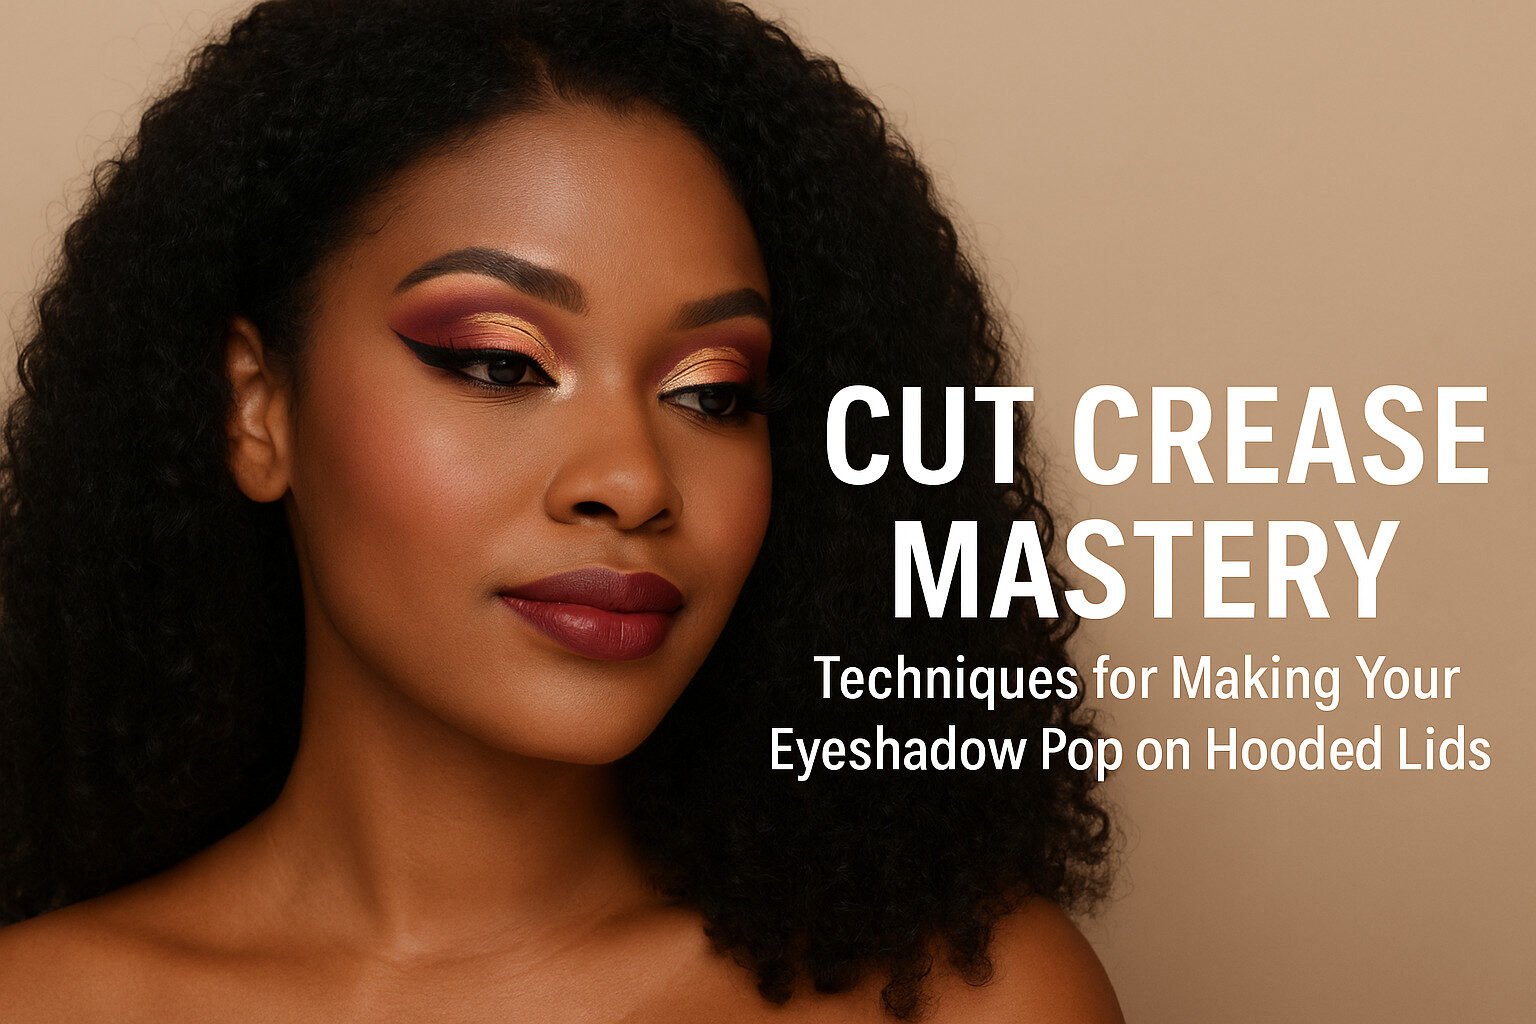
If you have hooded lids, you already know the struggle: shadows disappear, colors transfer, and your lid space seems to vanish the second you open your eyes. But here’s the truth — once you master the
cut crease, hooded lids become one of the most beautiful canvases for eye makeup, especially on rich, melanin-blessed skin.
In this guide, we’ll walk through everything you need to know, from understanding your eyelid shape, to choosing the right products, to step-by-step cut crease techniques that actually work for hooded lids. Whether you’re soft-glam for the day or full beat for the night, these tips will help your eyeshadow stay visible, vibrant, and defined.
Key Takeaways
- Understanding your hooded eye shape is crucial for effective cut crease application.
- Eyeshadow primer is non-negotiable for preventing creasing and transfer.
- Choosing contrasting shades for crease and lid makes the cut crease effect pop.
- Concealer helps create a clean, sharp cut crease line on hooded lids.
- Blending techniques are critical for a seamless, professional finish.
- Finishing touches like eyeliner, mascara, and lashes pull the whole look together.
Types of Hooded Lids
Not all hooded lids look the same — and that’s important. Knowing your type helps you decide where to place your “fake” crease so it actually shows, even when your eyes are open.
- Classic Hooded Lids – A visible fold that hides most or all of the natural crease.
- Deep Set Hooded Lids – The eyes sit deeper in the socket, creating a shadowed crease and more brow bone.
- Monolid Hooded Lids – Little to no visible crease, with a smooth transition from lash line to brow.
- Partially Hooded Lids – Some of the crease is visible, while part of it is covered by the fold.
- Asymmetrical Hooded Lids – Each eye has a slightly different fold or hood, requiring custom placement.
| Type of Hooded Lid | Key Feature |
|---|---|
| Classic Hooded Lids | Most common; fold hides the natural crease when eyes are open |
| Deep Set Hooded Lids | Crease sits deeper, more prominent brow bone and shadow |
| Monolid Hooded Lids | No defined crease; smooth lid space from lash to brow |
| Partially Hooded Lids | Only part of the crease is covered; partial fold |
| Asymmetrical Hooded Lids | Each eye has a different degree of hooding |
Determining Your Eyelid Shape
Look straight into a mirror with relaxed eyes. If your lid color disappears into the fold when you’re looking ahead, you likely have hooded lids. Notice:
- How much lid space is still visible.
- Whether the fold is even on both eyes.
- If one eye appears more hooded than the other.
This helps you decide where to place your cut crease: almost always above your natural crease line on hooded lids.
Common Variations of Hooded Lids
Different hooded shapes respond best to slightly different strategies:
- Classic hooded lids: Darker matte shades above the natural crease to “fake” a higher crease.
- Deep set lids: Slightly lighter crease shades to avoid making the eyes look too sunken.
- Monolids: Softer, blended gradients that create depth and dimension without harsh lines.
- Partially hooded: You can use bolder contrasts; just ensure you keep the crease visible when eyes are open.
- Asymmetrical: Adjust height and thickness individually for each eye—symmetry is the goal, not identical placement.
Essential Tips for Cut Crease Application
A cut crease on hooded lids is all about creating a new, higher crease that stays visible. Technique and patience matter more than perfection.
- Use a concealer that matches or is slightly lighter than your lid tone to carve the crease.
- Apply eyeshadow in thin layers instead of packing on a lot at once.
- Use a small, precise brush to sketch your new crease shape above your natural fold.
- Blend upward, not downward, so you don’t erase your crease definition.
- Set everything with powder or matte shadow to prevent transfer.
Choosing the Right Products
High-pigment, long-wear products are your best friends on hooded lids, especially for deeper skin tones where you really want those colors to stand out.
- Eyeshadow primers for oily or hooded lids:

Browse eyeshadow primers for oily/hooded lids on Amazon
- Eyeshadow palettes for dark skin: Look for palettes with rich browns, berries, golds, coppers, emeralds, and plums.

Explore eyeshadow palettes for deeper skin tones
- Flat concealer brushes for cutting the crease:

Shop flat concealer brushes
- Full-coverage concealers that match melanin-rich skin tones:
Browse concealers for dark skin tones
- Blending brush sets for seamless transitions:

Discover eyeshadow blending brush sets
Tools for Precision and Accuracy
On hooded lids, tool choice is everything:
- A small flat shader brush to pack lid color on the carved space.
- A tapered blending brush to soften the crease and transition shade.
- A tiny detail brush to define the new crease line with darker shadow.
- A fine-tipped liner brush if you’re adding gel or liquid liner on top.
- Q-tips or a makeup remover pen to clean up edges.
Step-by-Step Guide: How to Create a Cut Crease on Hooded Lids
| Step | Description |
|---|---|
| 1 | Preparing Your Eyelids |
| 2 | Applying the Base and Crease Color |
| 3 | Defining and Cutting the Crease |
| 4 | Blending and Finishing Touches |
Step 1: Preparing Your Eyelids
Start on a clean canvas:
- Gently cleanse your lid area to remove oil and old makeup.
- Apply a thin layer of eyeshadow primer from lash line to brow bone.
- Optionally set with a light dusting of translucent powder for a smoother surface.
For deeper complexions, choose a translucent powder that doesn’t leave a gray cast:
Browse translucent setting powders for dark skin
Step 2: Applying the Base and Crease Color
Next, you’re going to build your “fake” crease:
- Apply a neutral base shade (close to your skin tone) all over the lid.
- Choose a crease shade that’s 1–3 shades deeper than your skin tone (rich caramel, warm chocolate, chestnut, deep plum, etc.).
- With a fluffy brush, blend this crease shade above your natural fold so it’s visible when your eyes are open.
- Use circular and windshield wiper motions to diffuse the edges upward toward the brow bone.
The goal here: even with your eyes open, you should see that shadow creating a new, lifted crease.
Step 3: Defining and Cutting the Crease
This is where the magic happens:
- Take a smaller brush and use a deeper matte shade (deep brown, espresso, plum, or even black for drama) to trace a line slightly above your natural crease.
- Softly blend this line upwards but keep the bottom edge defined.
- Apply a small amount of full-coverage concealer to a flat brush.
- Starting at the inner corner, carve the lid space by tracing the crease shape along the bottom edge of your darker line.
- Look up once to let the concealer transfer — this helps mark how high your cut crease should go on hooded lids.
Take your time here. The cleaner the carve, the sharper the final look.
Step 4: Blending Techniques for a Seamless Look
Now, bring everything together:
- Pat (don’t swipe) your chosen lid shade directly onto the concealer while it’s still slightly tacky.
- Use a small blending brush where the lid color meets the crease color so they melt into each other.
- Keep the lid space bright and defined, and the crease soft and diffused.
Great lid colors for deeper skin tones include gold, bronze, copper, rose gold, champagne, emerald, and berry shimmer:

Explore shimmer eyeshadows that pop on dark skin
Factors to Consider in Hooded Lid Makeup
Eye Shape and Size
If your eyes are smaller, keep the crease shade tighter and focus on elongating the outer corner. If your eyes are larger or more deep set, lighter crease colors can help prevent the eyes from looking too heavy. Tailoring placement and intensity to your unique shape will always give you better results than copying a template.
Skin Type and Texture
Oily eyelids often cause creasing and transferring, so long-wear, waterproof formulas and a solid primer are critical. Dry lids may benefit from cream shadows or hydrating bases that prevent flakiness and patchiness.
For oily lids, look for “longwear,” “waterproof,” or “crease-resistant” formulas:

Shop waterproof and longwear eyeshadow sticks
Pros and Cons of the Cut Crease Technique
| Pros | Cons |
|---|---|
| Enhances definition on hooded lids | Can be time-consuming to perfect |
| Makes eyes look bigger and more lifted | Can look harsh if not blended well |
| Works with a wide range of color combos | May require specific brushes and products |
| Beautiful for glam, photos, and events | Might need touch-ups on very oily lids |
Advantages for Hooded Lids
The cut crease technique is especially powerful for hooded lids because it:
- Creates the illusion of more lid space.
- Prevents your lid color from disappearing into the fold.
- Shows off bold and metallic shades, even on deep skin tones.
- Balances the eye shape for a more lifted, open look.
Potential Challenges to Overcome
It takes practice to:
- Match the crease height on both eyes, especially if your lids are asymmetrical.
- Find primers and shadows that don’t crease or fade on hooded lids.
- Blend without losing the “cut” definition.
But once you dial in the products and technique that work for your eyes, the payoff is worth it.
Advanced Cut Crease Techniques
Color Blocking for Bold Looks
Color blocking is a dramatic way to make your cut crease stand out:
- Use one rich shade in the crease (e.g., deep plum, navy, or chocolate).
- Use a contrasting shade on the lid (gold, lime, teal, copper, etc.).
- Blend the transition lightly so you still see the separation.
Incorporating Glitter and Shimmer
Glitter and shimmer are stunning on deeper complexions and really amplify a cut crease:
- Apply a glitter adhesive or tacky base on the lid where you want the sparkle.
- Press loose glitter or a glitter shadow onto that area with a flat brush.
- Keep most of the glitter on the lid, not the crease, to maintain definition.
Find glitter adhesives and eye-safe glitters:

Shop glitter adhesives and glitter shadows
Finishing Touches: Liner, Mascara, and Lashes
Once your cut crease is in place, liner and lashes finish the look:
- Eyeliner: A slim wing or tightline helps define the lash line without hiding your hard work.
- Mascara: Focus on lifting and lengthening to open the eyes.
- Lashes: Choose styles that are a little shorter in the inner corner and longer toward the outer edge to create lift.
Explore products that complement cut crease looks:


To Wrap Up
Ultimately, mastering the cut crease on hooded lids is about strategy, not perfection. By understanding your eyelid shape, prepping with the right primer, using high-pigment shadows that flatter deeper skin tones, and carving your crease just above the natural fold, you can make your eyeshadow look intentional, lifted, and vibrant all day.
Give yourself time to practice, experiment with colors that look gorgeous on melanin-rich skin, and don’t be afraid to play with glitter, shimmer, and bold shades. Your hooded lids aren’t a limitation — they’re a powerful canvas.
FAQ: Cut Crease on Hooded Lids
Q: What is the cut crease technique?
A: The cut crease technique uses a contrasting shade and a carved line (usually with concealer) to sharply define the crease area. This makes the eyes look larger, more lifted, and more defined — especially helpful on hooded lids where the natural crease is hidden.
Q: How do I find the right crease line for my hooded eyes?
A: Apply a bit of concealer on your lid and look up. Where the concealer transfers marks the highest point your cut crease should reach to stay visible. Use that as a guide and carve slightly above your natural fold.
Q: What products work best for a cut crease on hooded lids?
A: Look for:
- High-coverage concealer to carve the crease
- Matte shadows for defining the crease
- Metallics or shimmers for the lid
- Longwear, crease-resistant formulas
You can browse good starting options here:

Eyeshadow palettes for deeper skin
Q: How can I make my cut crease last all day?
A: Use an eyeshadow primer, set your concealer with a bit of powder before applying shadow, and finish with a setting spray. Opt for waterproof or longwear formulas if you have oily lids.
Q: What brushes are ideal for cut crease application?
A: A flat synthetic brush for concealer, a small detailing brush for defining the crease, and at least one fluffy blending brush for transitions. These three alone can completely change your eye looks.
Q: Can I do a cut crease without concealer?
A: Yes. You can create a softer cut crease using a lighter shadow on the lid and a darker one in the crease. However, concealer gives the sharpest and most dramatic result, especially for glam looks.
Q: Is the cut crease technique wearable for everyday makeup?
A: Absolutely. Use softer, neutral tones and a smaller contrast between crease and lid colors for a subtle, everyday cut crease. Save the bold colors and glitter for nights out and special occasions.
Related posts:
 Eyeliner for Hooded Eyes – Tips and Techniques That Actually Work
 Nadula Yaki Straight Bob Glueless Wig Review: Pre-Cut 7×5 HD Lace Front Human Hair Wig with Invisible Knots
 Visionary Eye Shadow Stick, Shimmer Cream Eyeshadow Pencil, Long-Lasting Makeup, Safe for Sensitive & Dry Eyes, Ophthalmologist Tested (Love At First Sight)
 Make It Pop Sungloss SPF 50 Review
 The Role of Antioxidant-Rich Skincare Products in Preventing Premature Aging in Darker Skin Tones
 The Role of Antioxidant-Rich Skincare Products in Preventing Premature Aging in Darker Skin Tones